ShopDreamUp AI ArtDreamUp
Deviation Actions

Introduction
As web services evolve, users tend to require the ability to customize the web pages that they see, as if they were applications themselves. We have, therefore, arrived at a time where once famous web sites have grown to become so-called web applications, where they don't only serve the purpose of online documents, but allow users to modify them according to their needs.
Especially in a website related to art, this is more true, as users tend to have very specific tastes and likes; not only that, but when it also involves a large community, this tends to be an absolute requirement, since it is the only way to allow people to explore a wider range of art and artists. Hence, deviantART could not exist without such as feature.
This user guide aims at explaining how to use the Customizable Frontpage of deviantART, which can range from a very simple customization to a very complex one, if one decides to use the extensive abilities and stretch it to its limits.
Getting Started
To begin, you need a deviantART account. It is unfortunately not possible for a logged out user to have a customizable frontpage, as the customization needs to be attached to a user account and saved for that specific person, in order for them to be able to see it when they later log in again. For this reason, anonymous users only see the default frontpage. You might actually be familiar with it:
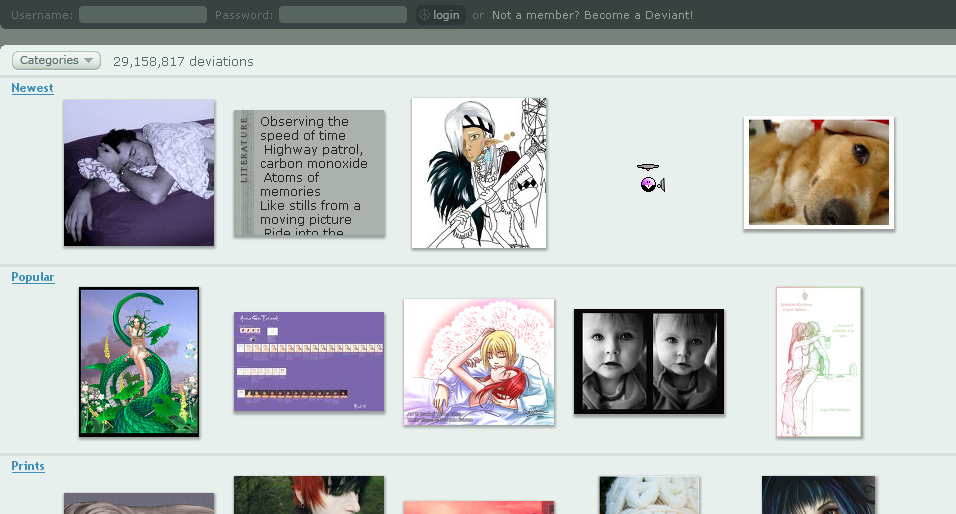
The same frontpage will be displayed as soon as you create an account and before you apply any modifications. That frontpage contains four channels:
- Newest
- Popular
- Prints
- Daily Deviations
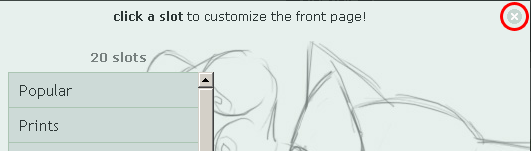
To start customizing, click on the "Customize" button on the top right corner of your frontpage, as shown in the screenshot below:

After your click on the button shown, the customization dialog will appear, allowing you to modify your frontpage as you wish.
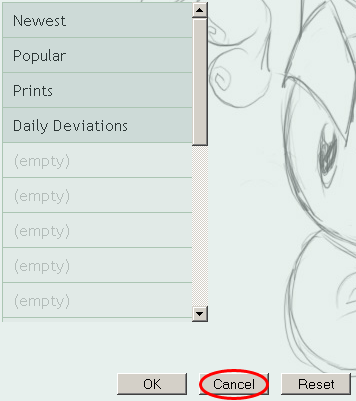
You can only modify your frontpage while in customization mode. You can get out of customization mode at any time by clicking the "Cancel" button. Keep in mind that this will discard any changes you have made from the moment you clicked on the "Customize" button:
...or you can click the close button on the top right corner of the box...
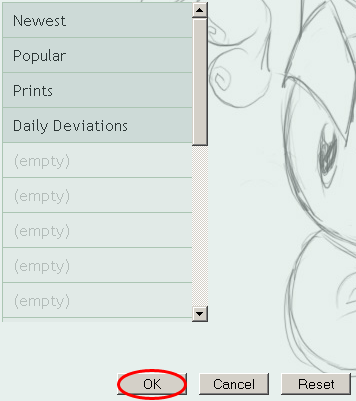
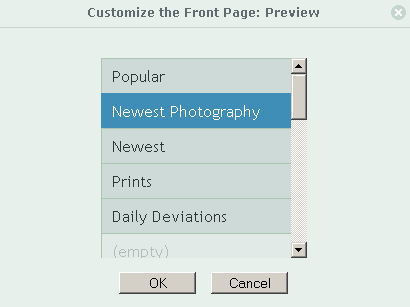
If you want to save your changes and get out of customization mode, you can always do that using the "OK" button. This will save your changes and reload your frontpage to display the new channels:
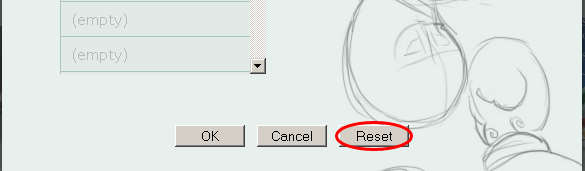
If you screw up at any time, you can use the reset button. Clicking it will clear all the modifications ever made to your frontpage and restore the four defaults (Newest, Popular, Prints and Daily Deviations):
Channels
A channel is a stream of deviations that are relevant to specific criteria. There are four types of channels:
- Basic Channels
- Category Channels
- Deviant Channels
- Advanced Channels
A channel can be technically anything; here are some examples:
- Popular deviations today
- Newest deviations
- Favourites of a specific user
- Popular deviations from a specific category
- Deviations by a specific artist
Your frontpage consists of several channels; when you start, you get the four default channels, which you can remove or replace.
Slots
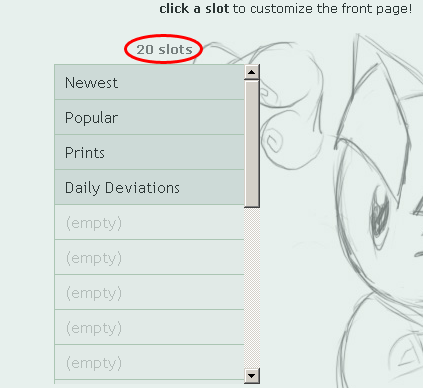
A slot is a space where a channel can be put into. If you are a subscriber, you are allowed to have up to twenty different channels, which means that your frontpage has twenty slots; else, you are only allowed to have up to four different channels, which means that your frontpage has four slots. A slot can either be empty or occupied with a channel.
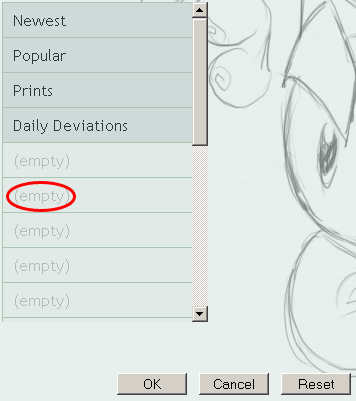
Empty slots are not being shown on your frontpage. If, for example, you have four slots and one of them is empty, you will only see three channels when you open up your frontpage. Empty slots are only visible during customization. An empty slot is denoted during customization as "(empty)" and is semi-transparent to illustrate that no channel has been assigned to it:
Occupied slots, on the other hand are opaque and are entitled after the channel they contain.
You can see the number of available slots at the top of the customization dialog:
If you are a non-subscriber, your 16 non-available slots will be denoted as "(reserved)" and shown in red, to illustrate that no channels can be assigned to them, while they are again semi-transparent to illustrate that no channel has been assigned to them.
Empty slots are collapsed when you save your frontpage. This means that your empty slots will always fall through to the end of the list when you save, keeping all the occupied slots at the top. You can have empty slots between occupied slots during editing, to help you manage your frontpage, but they will be moved to the bottom as soon as you save.
Modifying a Slot
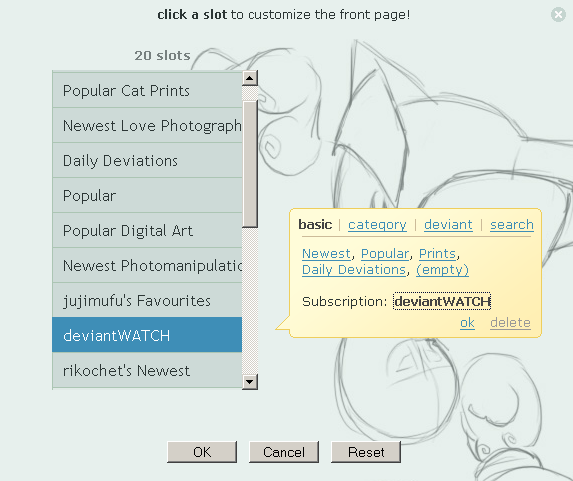
To modify a slot, first click on the slot that you want to change. The slot will turn blue, illustrating that it is currently being edited. A yellow bubble will appear letting you edit the specific slot, as shown in the screenshot below:
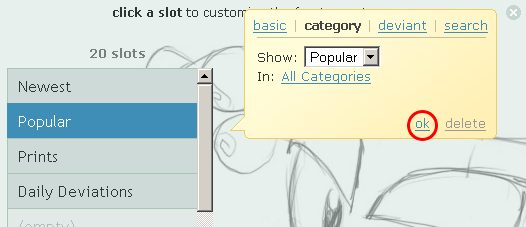
To save your modifications, you will need to click on the "OK" button of the bubble. Keep in mind that this is different from the "OK" button of the dialog!
You might notice that the slot title might occasionally change to "..." while you are modifying the slot. This is nothing to be worried about, as it means that the slot's title is yet to be determined, since you have to save your changes for that slot first.
Deleting a Channel
The easiest task you can perform when modifying a slot is simply delete the channel it contains and leave it empty. To do that, start modifying the slot as described above, and click on the "Delete" button:
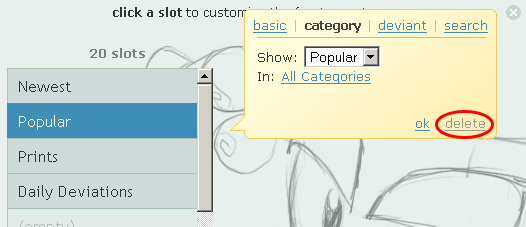
The slots below will replace the deleted slot, if any. Keep in mind that deleting an empty slot does not affect it in any way.
Moving a Slot
You can reorder the slots by dragging them around. Click and drag a slot above or below another slot to reposition it to the position you want.
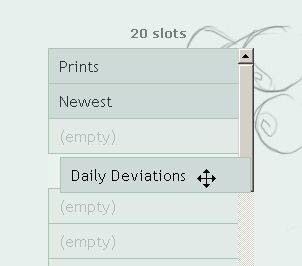
Keep in mind that empty slots (or reserved ones) cannot be dragged around. You can, however, drag an occupied slot in the middle of a bunch of empty slots.
Adding a Channel
To add a new channel, select an empty slot. It will turn blue, illustrating that you're editing the selected empty slot, and a yellow bubble will appear. You can select details for the selected slot inside the bubble. After you have finished making your selections, click on the "OK" button of the bubble to save your changes for the specific slot.
Choosing a Channel Type
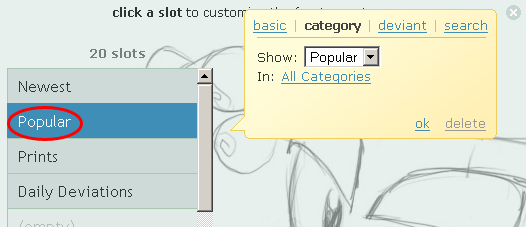
When the yellow bubble is visible, whether you're about to edit an existing slot or create a new one, you first get to pick the channel type. As mentioned above, you can choose between four different types of channels: "Basic", "Category", "Deviant", and "Search". When you choose any channel type, it's highlighted and more options are displayed regarding it inside the bubble. Try, for example, modifying a slot and picking the "Category" channel type. Here's how this would look like:
Basic
The Basic channel type allows you to use one of the following channels. Just click on one of them to use it.
Newest
This basic channel displays newest deviations as they are submitted! If you like new and infamous art, this is definitely a must-have.
Popular
This basic channel shows popular deviations from the last 24 hours. It's really interesting what you can find here, as art from all categories gets mixed up to form this beautiful channel.
Prints
This basic channel displays today's prints. As prints go through quality assurance processes, this also most probably will show good pieces of art, that are also available as prints. If you're looking to decorate your room, be sure to have this on your frontpage until you find something cool.
Daily Deviations
This basic channel displays staff picks for today. These pieces are chosen by deviantART staff, between lots of others, because of their good quality.
(empty)
Selecting this basic channel is equivalent with deleting the selected slot. It clears the slot and moves it to the bottom so that other occupied slots can be shown at the top.
deviantWATCH
This basic channel displays the latest submissions from people in your deviantWATCH. This channel is only available to subscribers.
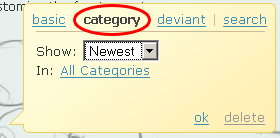
Category
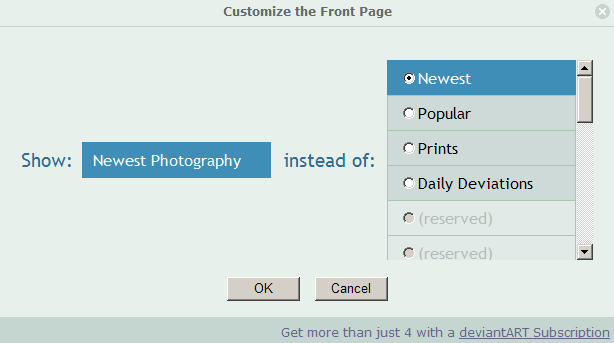
The Category channel type allows you to use a category as your channel. From the "Show" box select either "Newest" or "Popular". "Newest" will show the latest submissions in the category. "Popular" will show more popular pieces of the category. To pick a category, click on the "All Categories" link next to the "In:" label, as shown in the screenshot below:
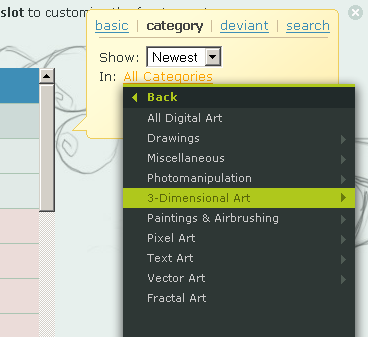
Navigate through the menu to pick the category you'd like, then click on it. The text "All Categories" will change to depict your choice.
Deviant
The Deviant channel type allows you to show art related to a specific deviant. Start by typing the name of the deviant you are interested in, in the "Who" textbox. If the user is in your friends, you can either type their name or pick them from the Friends box. To open the Friends box, click on the "Friends..." link inside the bubble. You will then be able to pick one of your friends to use as the target of the deviant-type channel:
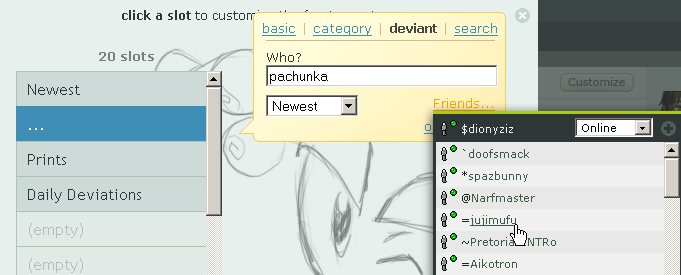
After you decide which deviant you want the channel to be about, you will have to pick what you want to see from that user. Possible options are "Newest" and "Favourites", which you can pick from the menu appearing right below the "Who" textbox. Picking "Newest" will display the latest submissions by that specific user, while "Favourites" will display the latest deviations added to the user's favourites.
Search
The search channel, sometimes referred-to as the "advanced channel", allows you to create any type of channel you want, with practically no limitations. You can use the "Keywords" textbox to create a channel out of anything you can think of. The option box on the right allows you to choose between "Newest" and "Popular" deviations. "Newest" will display latest submissions that match your search criteria, while "Popular" shows most popular deviations according to your search criteria.
The "Just Prints" checkbox can be used to filter out prints only. When checked, non-prints deviations matching your search criteria will not be displayed. When unchecked, all deviations matching your search criteria will be displayed:
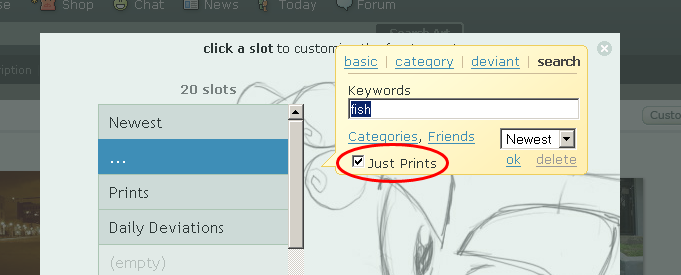
You can use the "Categories" link below the "Keywords" textbox to add a criterion that will only show deviations from a specific category. You can use the "Friends" link below the "Keywords" textbox to only show deviations from a specific deviant. Both these utilities will add a keyword to the existing keywords typed in the "Keywords" textbox.
Keywords can contain anything really. For example, you can use the word "fish" to only show deviations related to fishes. Or the word "cat". Or "love". You can separate multiple terms by spaces; if you do, only deviations matching all your terms will be displayed. This functionality is really similar to the search feature of deviantART. You might be interested in more details about stuff you can search for.
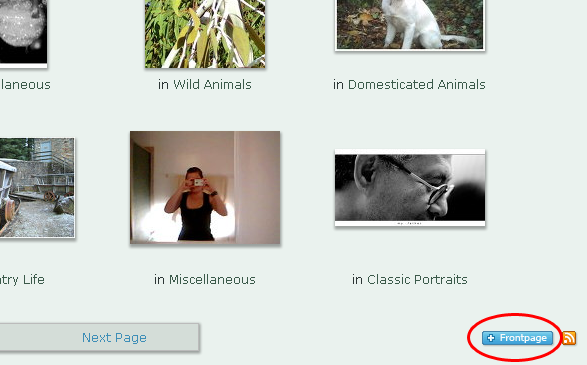
+frontpage
On certain deviantART browse pages, such as the pages in which you can browse for a specific category, a certain artist's art, or a user's favourites, you will see the +frontpage button:
<img src="s.deviantart.com/news/customiz…" alt="The +frontpage Button" />
This button can be used to add the channel you are currently browsing to your frontpage. To do so, click on it. A dialog similar to the frontpage customization dialog will appear:
The functionality of this dialog is similar to the one of the frontpage customization dialog -- only with certain limitations. It will create a new channel in one of your empty slots (if any) and let you move it to the position you want by dragging the slot around. The "OK", "Cancel" and closing buttons work similarly. You can modify the slots added using the +frontpage method by customizing your frontpage as described above.
In case your frontpage does not have an empty slot, the following dialog will appear, allowing you to choose which slot's channel you want to replace with your new channel:
To do so, simply pick a slot to empty by clicking on the selection button next to it. The channel of the slot you pick will be replaced by your new channel after you confirm by clicking the OK button.
Epilogue
So, play with customization; now you can have any type of art you want, right on your frontpage:
Halloween party?
Anyone partying tonight? Where at? :)
Moris88...
...tagged me!
Rules of the game:
- Choose a singer/band/group
- Answer using ONLY titles of songs by that singer/band/group
- Tag 6 more people (let them know they've been tagged)
I choose Sum 41. Not because their titles fit my personal answers, but just 'cause it'd be funny.
1. Are you male or female?
What I believe
2. Describe yourself.
Walking Disaster
3. What do people feel when they're around you?
Pain For Pleasure
4. How would you describe your previous relationship?
All Killer No Filler
5. Describe your current relationship.
Nothing On My Back
6. Where would you want to be now?
Amsterdam
7. How do you feel about love
With two versions of dA on my back...
...the second being just outside of the door, I believe it's about time we got rid of that $ for a while :)
:salute: to...
`spyed (https://www.deviantart.com/spyed) for the brightest management I've seen
:iconmccann: as my best technical mentor so far
:iconpachunka: for Freezepop
:iconchris: for his networking knowledge
:iconhexentanz: for her dedication
:iconlolly: for being funny
:iconzilla774: for the sexy accent
:iconagorf: for the continuation of my work
:iconjekor: for lambda's sake
:iconmudimba: for telling me about the essence of Kung Fu
:iconrandomduck: for reinventing agile
and also...
:iconmicahgoulart: :iconheidi: :iconstarvingartist: :iconanna:
Martian Headsets
You’re about to see the mother of all flamewars on internet groups where web developers hang out. It’ll make the Battle of Stalingrad look like that time your sister-in-law stormed out of afternoon tea at your grandmother’s and wrapped the Mustang around a tree.
[http://www.joelonsoftware.com/items/2008/03/17.html]
© 2006 - 2024 dionyziz
Comments155
Join the community to add your comment. Already a deviant? Log In
I don't have a customize button at all.
I went to the front page. I understood the tutorial. I'm even subscribed, not that it seems to matter.
I just...don't have a button. No button.
Help?
I went to the front page. I understood the tutorial. I'm even subscribed, not that it seems to matter.
I just...don't have a button. No button.
Help?